Showing posts with label video. Show all posts

Monday, April 23, 2007

Why Frame Rate Matters

I saw the following in MythTV's forum (MythTvTalk):
"Once the video is captured in the file (...), you are past any PAL/NTSC differences..."

While this is true in some aspects, it's very wrong with regards to one important aspect: frame rate. Why is frame rate important? Because there's no way to do interpolations on time.

Let's think about it this way - if your monitor is set to 1024 x 768 and the movie you're watching is using a different resolution, it's relatively easy to scale the movie to fit the entire screen - scaling using various methods of interpolation has been done a lot. In most cases, it's the video card that does the scaling, so it doesn't even affect your computer playback performance (scaling doesn't work well on interlaced video, which is one of the reasons I think interlaced video sucks, but that's the topic for another post).

If your monitor is set to 60Hz (it's practically showing 60 fps), and you're watching a PAL movie that runs at 25 frames per second, there's no way to interpolate 60 frames out of the existing 25 frames. Instead, during playback frames are repeated so that the overall speed of the movie is maintained.

Here's an easy example, and let's assume that NTSC runs at exactly 30 fps for simplicity: If your monitor is set to 60Hz, and you play a 30 fps NTSC movie, each frame is shown for two progressive scans of the screen - the frame rate is maintained exactly, and the quality and smoothness of the video is excellent.

But now try to watch a 25 fps PAL movie using the same monitor. Now you have to fit 25 original frames into 60 display frames. That's 5 original frames into 12 display frames (in 1/5 of a second). There's no way to spread the frames evenly. Let's assume an original frame switch is done as soon as it should be shown, but not within a display frame (otherwise you'll see a discontinuity at a certain vertical position, whenever there's horizontal motion between frames). That's the way DirectShow works on Windows. In this case, here's how 1/5 of a second would look like:


After this conversion, some of the frames would be shown for 1/30 of a seconds, and some would be shown for 1/20 of a second, there's actual a rhythm here: 3,2,3,2,2. This rhythm will repeat itself 5 times per second throughout the video you're seeing. The visual result of this is called judder, and is especially common when converting films to NTSC.

How annoying is this jitter? Many people wouldn't be able to spot the problem, but the video would looks a bit jumpy. It's especially visible in scenes of consistent (and slow) horizontal movement of the camera (panning).

Connecting your PC to a TV

What if you have a TV-Out option on your display card, and you hook your PC to a TV? Will this solve the problem? The TV shows 25 fps, and the movie also has 25 fps, but there's no way to skip the 60 fps of the display adapter (actually, some display adapters lock the frame rate to something sensible when the TV-Out is turned on, but let's assume you can feed a PAL TV from a display card showing 60 fps).

In this case the result is even worse. The display adapter has to convert the 60 fps back to 25 fps without knowing the original material was in 25 fps. This would probably look like this:


What happened here? The first original frame (red) is shown without a problem, but by the time we need to show the second frame (on the TV), the second video frame (yellow) is not yet shown, so the red frame will be shown once more. The outcome is that out of every 5 frames, one will be repeated, and one will be skipped. This is a pretty noticeable judder.


What's the Solution?

In some cases it's quite simple - if you're using your PC to watch video, make sure the display refresh rate matches your video's frame rate. If you watch PAL movies, set your display to 75Hz or 100Hz. If you watch NTSC movies, it sounds like you should set your display to 60Hz (or 90Hz or 120Hz), but most NTSC shows are actually filmed at 24 fps (film rate), so the best frame rate is a multiplication of that, probably 72Hz.

Is that all?

No, of course not. Many people in Europe want to use their computers to watch both shows they recorded using a capture card (which will be recorded at 25 fps) and movies or US TV shows (which are recorded at 24 fps). How do you set your monitor's refresh rate in this case? I'll leave that to the next post.

Wednesday, February 14, 2007

Why I want an HD based DVD/Xvid player

Why I need an HD based DVD player
The reason is quite simple. I have two kids. The older is 3.5 years old and the younger is 2.5 years old. The both watch a fair amount of kids' DVD and like other kids their age, they love seeing the same movies over and over again. Like other kids their age, they've become experts at operating the DVD player and scratching the DVD discs quite hard.

There's no use, DVDs are much better than the old VHS videocasettes (I can't even watch VHS content anymore), but for sure, they're less kids-proof. What's can I say? They're less durable. When you rent a DVD that's not new it's more likely it will pause and skip and stutter than an old VHS tape. The tape deteriorates over time, and the initial quality is lower, but a DVD can become unusable much faster.

Why I need an HD based DVD player? So I can rip those kids DVDs and have them on a hard drive for repeated playback. I would then store the kids' DVDs up with my grown-up DVD collection. If you carefully protect your DVDs like I do, I hope we'll be able to watch them for many more years.

Why I need an HD based Xvid player
I'm downloading videos over the internet, usually using Azureus. I'd like to watch those videos on my 32" TV in the living room, not in the spare room where my computer is. These days, whenever I download something, I burn it on a CD-RW and take it to my DVD/Divx player that's connected to my TV. This wastes a lot of time. I still don't understand why it takes over 10 seconds for a DVD player to recognize a media once it's inserted, but that nothing compared to the few minutes it takes to erase the CD-RW and then rewrite it with the video I downloaded. In addition, CD-RW discs are generally not very reliable. Every once in a while the burn fails, or succeeds, but the player doesn't read the disc or freezes in the middle etc. I need something more reliable like an HD, where I'm sure the information is stored properly.


What I want from an HD based DVD/Xvid Player
I want to be able to play videos without being afraid that my media will be scratched (by my kids, not the player) or that I'll need to burn CD-RWs all the time. Wait, that's not enough. I'm picky and I have more demands:

  • I won't settle for image quality that's less than what I get from a DVD player. I have a Compaq/HP nw8000 laptop with TV out (S-Video), but the video out quality is not on par with DVD players. The image is washed out and I can't get overscan to work properly.
  • I won't settle for poor video decoding performance which introduces frame skips and other visual distractions.
  • I won't settle for something that outputs only NTSC or PAL. I have a multisystem TV, and I want to see PAL movies in PAL and NTSC movies in NTSC. A conversion is doable, but changing frame rates introduces some jitter to the video that really annoys the eye.
  • I'd be happy to be able to attach thumbnails to files, so that it's easier for my wife and kids to find the videos they want to play.
That's basically it. I don't think that's too much to ask...

Thursday, December 28, 2006

Field Dominance (or Why Interlaced Sucks)

In a previous post, I said HD 1080i sucks because interlaced, in general, sucks. I went on to explain a few things there. Recently I edited a home movie from old footage of my niece (for her birthday), and tackled a nasty interlaced issue called "Field Dominance". Here's one more reason why interlaced video should be abandoned...

Let's skip the definition on interlaced video (You can always pick it up from Wikipedia), I want to concentrate on working with interlaced video while editing movies - I've used Pinnacle Studio and tried Adobe Premiere. If the content was progressive, 3 consecutive frames might have looked something like this:


But the video is interlaced, so you know how it looks like - the infamous comb lines. So allow me to demonstrate this as if interlacing was not done line by line, but rather in chunks of lines:


Wait, that's not the only possible way the video could look like, there's another option:


Do you see the difference? It's quite subtle - in the first image, the car is a bit backwards on the even lines. This means that the even lines were captured first, and then the odd lines. This is called bottom field first. In the second image, the odd lines were captured first and then the even lines. This is called top field first. Which field is first? This is called field dominance, and it's one more thing you need to worry about when using interlaced video.

Where's the problem? When you're showing the interlaced movie, you have to know which field to show first (and send it first to the TV). If you get it wrong, you're sending the data at the wrong time. In our case the car would move a bit backwards, and then more forwards, then a bit backwards, and then forwards, etc. If you don't understand if completely, just believe me, it looks really bad.

How did I end up having a movie with field dominance issues? I used old video materials for my video, from multiple sources. I captured most of the video using a VCR connected to an Analog-toDV converter, but some of the video was already converted to DVD. The problem was that all my captured material was bottom field first (as is standard in DV), and the DVD originated video was top field first. When you combine TFF and BFF videos, you're bound to have jittery video in the scenes where the field dominance is wrong.

The real problem is that you don't see this problem until you actually see the video on an interlaced device. You see the regular comb lines, but have no way of knowing if the video is BFF or TFF.

Fortunately, I still had my original assets (video material), so I just had to reverse the field dominance on these specific video files. I originally thought of writing a VirtualDub plugin for this, but (of course), there's an excellent plugin called Reverse Field Dominance already available written by Donald A. Graft.

Of course, reversing the field dominance comes with a price:
  • You have to reencode the video, so if, for example, you're working with DV material, you loose something.
  • You either bring everything one pixel up (best solution in my mind) or shift the content one field earlier or later. In any case you introduce either a spatial or temporal change to the video.
What can I say, just use progressive video if you can.

Monday, November 06, 2006

Converting DVD content to DV

Why should you convert DVDs to DV?

If you’d like to backup complete DVD movies, there’s little sense in converting them to DV. A 2-hour movie, converted to DV would consume a lot of your HD space - something like 26GB. DV is used for video editing, so if you’d like to edit your own videos, and insert clips from DVDs into them, this tutorial is for you.

What you need

You'll need the following:
  • DVD content - these are VOB files that contain the video materials. We’ll talk more about these files later.
  • VirtualDubMpeg2 - a variant of the popular VirtualDub program that supports the MPEG2 format (the format used in DVDs). Get version 1.6 or newer, otherwise you might have synchronization issues with NTSC video. You'll also need a an AC-3 codec, see information in the above link.
Obtaining the DVD content

Open the DVD using Explorer. You should see 2 folders in it: AUDIO_TS and VIDEO_TS. Open the VIDEO_TS folder. You’ll see something like this:


The audio/video content is kept in the VOB files. These are definitely the larger files on the DVD. Usually, the main movie is stored in VTS_01_1.VOB, VTS_01_2.VOB, etc. Other VOB files contain extras and menus.

The DVD standard dictates that VOB files will be at most 1GB in size. Each such files stores 20-25 minutes of video. You’ll have to find the VOB with the movie segment you’re interested in (again, I assume you’re not planning on converting a whole movie to DV, it just doesn’t make sense). You’ll do that by opening each VOB in VirtualDubMpeg2 and checking the content in it. Since you’ll be working a lot with the VOB files, I suggest you copy them to your HD, and remove them after you’re done.

One last note: An original DVD is encrypted and cannot be read by VirtualDubMpeg2. You’ll have to decrypt the DVD using a software like DVD Decrypter, DVDFAB Decrypter or DVD Shrink. In some places around the world this decryption is considered illegal, while in other, it’s allowed as long as it’s used for creating backup of content you legally own. In any case, I’m sure doing this to add a few 5 second clips into your son’s Bar-Mitzvah’s movie won’t result in an FBI team knoking your door. Still, you’ll have to find another tutorial to see how to work with these decryption software programs.

Loading the DVD video into VirtualDubMpeg2
  1. Run VirtualDubMpeg2 (the executable is called VirtualDub, so I’ll be using this name from this point forward).
  2. To load a VOB file, either drag-n-drop the file into VirtualDub or use File » Open video file…
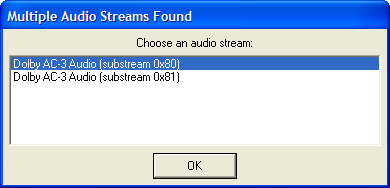
  3. In many cases, the video within the DVD contains multiple audio streams (usually for multiple languages or director’s commentary). If that’s the case with your DVD, you’ll see the following dialog:

    You’ll have to choose the audio stream to be used in your DV avi file. a DV avi file can only have a single audio stream. If you don’t know which audio stream to choose, pick the top one. You can later play the video, and if it’s the wrong audio track, reload the VOB and choose another…
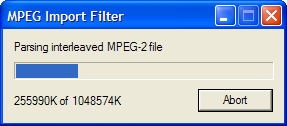
  4. VirtualDub will now scan the VOB file, this should take a few seconds. If you load the VOB directly from the DVD disc (you didn’t bother to copy the VOB to your HD), it might take a few minutes. You’ll see the following progress dialog:

    If you only used VirtualDub for manipulating AVI files, you never saw this progress dialog. The AVI file format requires no parsing, since it contains a chunk with this information (towards the end of the movie). A VOB file requires such parsing.
Converting the video to DV
  1. First, you might want to select the range you want to convert. Remember, DV takes 3.6MBps (that’s Bytes, not bits per second). There’s a chance the range you’re intereseted in is actually between VOBs. We’ll talk about this later.
  2. We’ll now set the audio conversion options:
    • Select the Audio » Full processing mode option.
    • Now select the Audio » Compression… option. The audio compression dialog will open:
    • Make sure the option is selected. DV audio is stored as uncompressed 16 bit stereo samples at 48Khz. Fortunately, DVD audio is also stored at 48Khz, which means no sample rate conversion is required. Click the OK button to return to the main screen.
  3. Next, we’ll set the video conversion options:
    • Make sure the Video » Full processing mode option is selected.
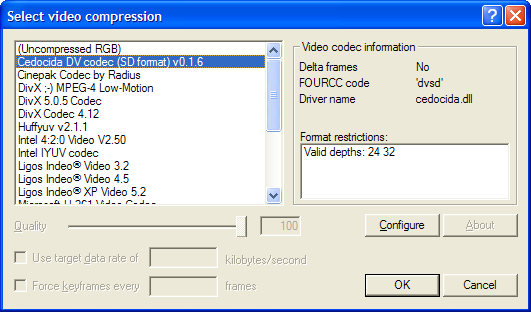
    • Select the Video » Compression… option. The video compression dialog will open:
    • Select the Cedocida DV codec compression (selected above). Click the OK button.
  4. Now, to convert to DV avi, choose File » Save as AVI… (F7). Choose a name for your file and click the Save button. Now sit back and wait while the conversion (or transcoding) takes place. Either that, or you can read on, for a few “advanced” topics…
Advanced: Handling Wide Anamorphic DVDs

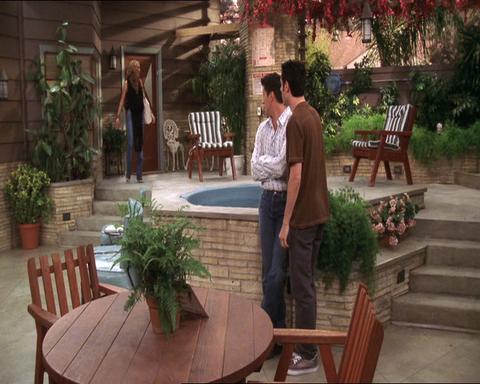
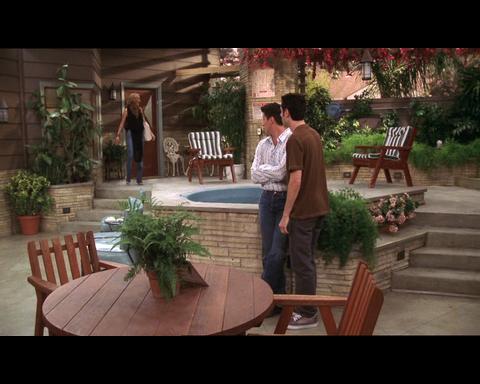
Many DVDs are encoded in anamorphic widescreen format. If that’s the case, looking at the video in VirtualDub, everything should look vertically streched - all people will look tall and narrow. For example, see the following frame from the TV show ‘Joey’:


This will also happen when you combine this video with your content, which you probably didn’t shoot in anamorphic widescreen. You’ll have to resize the video content to fit your video.

The reason for this is very simple. Your video is shot in “normal” 4:3 mode (if it doesn’t, you can safely skip this part). The video on the DVD is stored in widescreen format known as 16:9. The two formats (wide and normal), can’t co-exist in a single movie. You’ll need to modify the DVD video to fit your video. You have two options:
  • Add black bars at the bottom and top of the DVD video. The added bars increase the height of the video image so that it’s 4:3. You’ll see the whole content of the original DVD video, but it will look smaller. This method is called “Letterbox”. The above frame should looke like this in letterbox format:
  • Crop the DVD videe, removing some content, usually from the sides of the image. You remove just enough content so that the video image is 4:3. You’ll loose some of the content of the original video, but it will occupy the whole screen. This method is called “Pan & Scan”, although we won’t do any panning when we implement this method. The above frame should look like this in cropped format (notice the missing plant on the left hand side):
To letterbox the video, perform these steps just before saving the AVI:
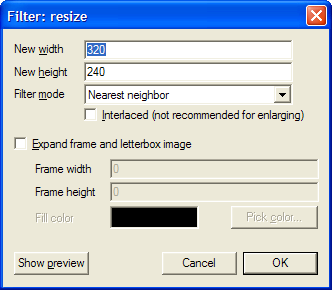
  1. Choose Video » Filters…. Click the Add… button, choose the resize filter and click the OK button. You’ll see the following dialog:
  2. Check the Expand frame and letterbox image
  3. Based on your TV system (Europen PAL or American NTSC), fill the following values in the dialog fields:
    FieldPAL valueNTSC value
    New width720720
    New height432360
    Frame width720720
    Frame height576480

  4. Click on the OK button. You’ll return to the filter list dialog, which should show the resize filter. Click OK to exit from the filter list. You can now save your letterboxed AVI.
To crop the video, perform these steps just before saving the AVI:
  1. Add a resize filter as described above. Don’t check the Expand frame and letterbox image, and fill in the following values, based on your TV system (PAL or NTSC):
    FieldPAL valueNTSC value
    New width720720
    New height576480

  2. Click on the OK button. You’ll return to the filter list dialog, which should show the resize filter. It should be selected. Now click the “Cropping…” button.
  3. For fields “X1 offset” and “X2 offset”, fill the value 90. Leave “Y1 offset” and “Y2 offset” as is (zero) and click the OK button. Click OK again to exit the filter list. You can now save your cropped AVI.
Advanced: Joining VOBs

There’s a chance the video fragment you’re interested in starts in one VOB and ends in another (probably the next one). You could convert each part separately, but there’s a slight risk of a sound click between segments. To do it the right way, you’ll need to combine the two VOBs into a single file, which you’ll then open in VirtualDub.

If you’re not afraid of using the command line, it’s quite simple to combine two VOBs into once. Just use the COPY command in the following way (assuming the current directory is where you want to store the result VOB):

copy d:VIDEO_TSVTS_01_1.VOB /b + d:VIDEO_TSVTS_01_2.VOB /b COMBINED.VOB

This command says to copy the binary (/b) file VTS_01_1.VOB and the binary file VTS_01_2.VOB into a file called COMBINED.VOB.

Wednesday, November 01, 2006

HDTV is cheaper than your old TV

Okay, not for everyone, but if you want to really enjoy seeing movies at your home, you should be happy that HDTV is getting closer and closer, because it's going to be much cheaper to enjoy a cinema-like experience at your home.

How come? Everyone is talking about how expensive high-def TVs cost and the premium you have to pay for high-def players that support BluRay or HD DVD. While this is true, providing content in HD is essential for lowering the cost of cinema-like experience at your home.

To recreate the cinema experience at your home you'll have to use a projector (maybe a 65" Plasma/LCD display can do the job as well, it's unlikely I'll be ever rich enough to know). Show the average guy a wide 100" diagonal screen, project any decent DVD content on that screen, and he'll tell you it's like going to the cinema, but it's not.

The fact of the matter is that a DVD simply doesn't hold enough data so that a 100" diagonal display would look good enough on it. The image is not sharp enough and you begin to see the compression artifacts. You now have two options:

1. You can watch DVDs on a smaller screen. 32" to 42" is fine. The DVDs would look great, but you'll definitely loose the cinema-like feeling.
2. You can start investing in equipment that will try to digitally enhance the DVD image so that it will look better on a large screen. I did a quick search on such a device - the Faroudja DVP-1510. It costs $7,299.99 (that's web price as of October 2006, not MSRP). You can try the cheaper DVP-1010, which will "only" cost $3,299.99.

I know there are such video processors for around $1000 (for example DVDO Iscan HD), but one has to wonder why these devices are so expensive. The simple answer is that these devices are supposed to perform the impossible, and that's quite hard - they try to create an image that's better than the source. They try to add details to an image (well, to a video - a sequence of images) so that it would be good enough to show on a large screen. Since the original image doesn't have enough detail, they have to perform really complex tricks, and billions of calculations per second to give us the impression of images with more information.

The funny thing is that these devices can perform this magic, but the price is very high.

Enters HDTV. At 1280x720 pixels, a HD image has 2.6 more data than an NTSC DVD frame (with 720x480 pixels) and 2.2 more data than a PAL DVD frame (with 720x576 pixels). No magic from Faroudja (and at no cost) can add so much information to an image. Now that's only the "low-resolution" HD. At the higher HD resolution, a 1920x1280 image fits exacly 6 DVD images. That's really a lot of pixels for our eyes.

So what's the bottom line? If the source is high-def enough, you won't have to invest in technology to enhance the image so that it's decent on a large enough screen. Trying to recreate the added data is a very complex and expensive task (and the results are never as good as HD). If you buy an HD player instead of a good scaler, you'll have enough spare money for a good projector.

Only with HDTV you could really have a home theater (that gives you a cinema-like experience) on a budget.

Monday, October 30, 2006

Don't buy an HDTV, buy an HD camcorder

It's quite expensive to buy good high-definition equipment. Prices are going down and new
technologies emerge all the time. In addition, it's hard to justify the cost, when there's not enough
content that's broadcasted in high definition.

If you're in the US, you're in good shape, since you can enjoy a few hours of HDTV every day, but
outside of the US it's even harder to find high-definiton content.

Don't get me wrong - seeing an episode of Lost in 720p is ten times better that watching it on a
standard NTSC TV, so if you can afford it, jump in. But if you can't, you might still need to think
about buying an HD camcorder.

I have two kids. They're 3 and 2 years old. As you probably know, in this time and age, you get the
baby out of the hospital with a digital camera. It's just a part of the standard package. The pro
package includes a camcorder. I got the pro package, with a JVC DV camcorder. It's a nice camcorder,
and the image looks pretty good. But it will not look good in 10 years when I sit next to my 20Ghz PC
and use Adobe Premiere Elements 17 to prepare a short video clip for my son's Bar-Mitzvah. It will
not look good since in 10 years we'll all have HDTVs and we'll be used to high definition videos.

I want to be able to watch my kids' videos in 10 years and not think of the "artistic quality" of the low
resolution images we got when we shot videos back in 2006. I want to preserve today's memories
in the highest quality I can. It's more important to me to see my kids in high-definition than
Evangeline Lilly. Maybe now it doesn't seem that important. I see my kids every day, but in 10 years,
those extra pixels are going to be precious.

What can you do with the videos you shoot in HD today? You don't even have a high-def screen to
watch them, and your computer is too slow to edit these videos. That's okay. Just keep them in a safe
place, and wait for consumer technology to catch up with the quality of your videos.

Now you'll have to excuse me. I have to start saving for a Sony HDR-HC3 or a Canon HV10...