If you’d like to backup complete DVD movies, there’s little sense in converting them to DV. A 2-hour movie, converted to DV would consume a lot of your HD space - something like 26GB. DV is used for video editing, so if you’d like to edit your own videos, and insert clips from DVDs into them, this tutorial is for you.
What you need
You'll need the following:
- DVD content - these are VOB files that contain the video materials. We’ll talk more about these files later.
- VirtualDubMpeg2 - a variant of the popular VirtualDub program that supports the MPEG2 format (the format used in DVDs). Get version 1.6 or newer, otherwise you might have synchronization issues with NTSC video. You'll also need a an AC-3 codec, see information in the above link.
- Cedocida DV codec - a software codec for converting video to the DV format.
Open the DVD using Explorer. You should see 2 folders in it: AUDIO_TS and VIDEO_TS. Open the VIDEO_TS folder. You’ll see something like this:

The audio/video content is kept in the VOB files. These are definitely the larger files on the DVD. Usually, the main movie is stored in VTS_01_1.VOB, VTS_01_2.VOB, etc. Other VOB files contain extras and menus.
The DVD standard dictates that VOB files will be at most 1GB in size. Each such files stores 20-25 minutes of video. You’ll have to find the VOB with the movie segment you’re interested in (again, I assume you’re not planning on converting a whole movie to DV, it just doesn’t make sense). You’ll do that by opening each VOB in VirtualDubMpeg2 and checking the content in it. Since you’ll be working a lot with the VOB files, I suggest you copy them to your HD, and remove them after you’re done.
One last note: An original DVD is encrypted and cannot be read by VirtualDubMpeg2. You’ll have to decrypt the DVD using a software like DVD Decrypter, DVDFAB Decrypter or DVD Shrink. In some places around the world this decryption is considered illegal, while in other, it’s allowed as long as it’s used for creating backup of content you legally own. In any case, I’m sure doing this to add a few 5 second clips into your son’s Bar-Mitzvah’s movie won’t result in an FBI team knoking your door. Still, you’ll have to find another tutorial to see how to work with these decryption software programs.
Loading the DVD video into VirtualDubMpeg2
- Run VirtualDubMpeg2 (the executable is called VirtualDub, so I’ll be using this name from this point forward).
- To load a VOB file, either drag-n-drop the file into VirtualDub or use File » Open video file…
- In many cases, the video within the DVD contains multiple audio streams (usually for multiple languages or director’s commentary). If that’s the case with your DVD, you’ll see the following dialog:
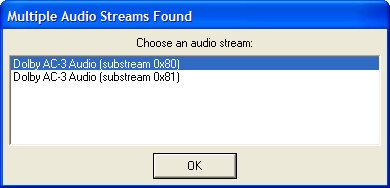
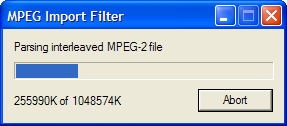
You’ll have to choose the audio stream to be used in your DV avi file. a DV avi file can only have a single audio stream. If you don’t know which audio stream to choose, pick the top one. You can later play the video, and if it’s the wrong audio track, reload the VOB and choose another… - VirtualDub will now scan the VOB file, this should take a few seconds. If you load the VOB directly from the DVD disc (you didn’t bother to copy the VOB to your HD), it might take a few minutes. You’ll see the following progress dialog:

If you only used VirtualDub for manipulating AVI files, you never saw this progress dialog. The AVI file format requires no parsing, since it contains a chunk with this information (towards the end of the movie). A VOB file requires such parsing.

- First, you might want to select the range you want to convert. Remember, DV takes 3.6MBps (that’s Bytes, not bits per second). There’s a chance the range you’re intereseted in is actually between VOBs. We’ll talk about this later.
- We’ll now set the audio conversion options:
- Select the Audio » Full processing mode option.
- Now select the Audio » Compression… option. The audio compression dialog will open:

- Make sure the option is selected. DV audio is stored as uncompressed 16 bit stereo samples at 48Khz. Fortunately, DVD audio is also stored at 48Khz, which means no sample rate conversion is required. Click the OK button to return to the main screen.
- Next, we’ll set the video conversion options:
- Make sure the Video » Full processing mode option is selected.
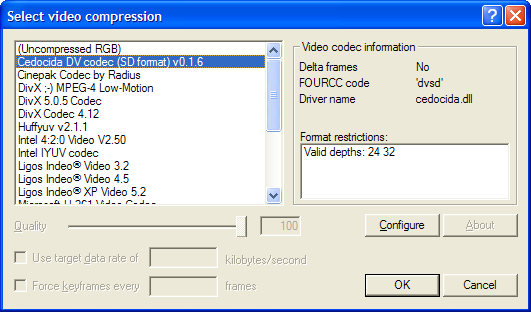
- Select the Video » Compression… option. The video compression dialog will open:

- Select the Cedocida DV codec compression (selected above). Click the OK button.
- Now, to convert to DV avi, choose File » Save as AVI… (F7). Choose a name for your file and click the Save button. Now sit back and wait while the conversion (or transcoding) takes place. Either that, or you can read on, for a few “advanced” topics…

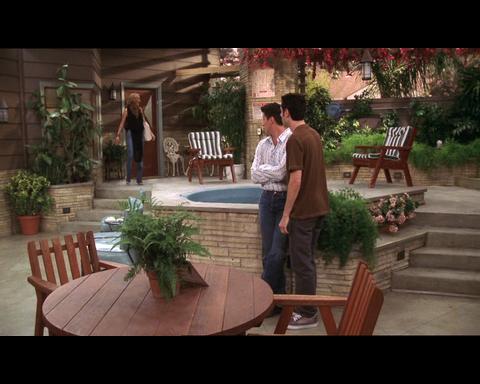
Many DVDs are encoded in anamorphic widescreen format. If that’s the case, looking at the video in VirtualDub, everything should look vertically streched - all people will look tall and narrow. For example, see the following frame from the TV show ‘Joey’:
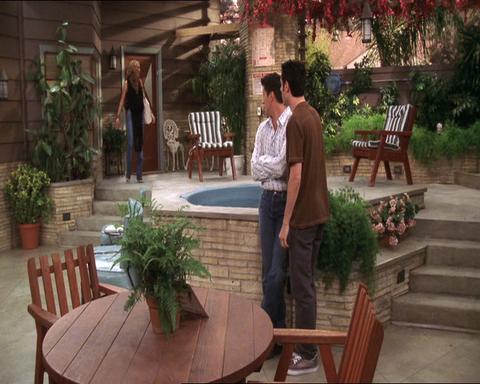
This will also happen when you combine this video with your content, which you probably didn’t shoot in anamorphic widescreen. You’ll have to resize the video content to fit your video.
The reason for this is very simple. Your video is shot in “normal” 4:3 mode (if it doesn’t, you can safely skip this part). The video on the DVD is stored in widescreen format known as 16:9. The two formats (wide and normal), can’t co-exist in a single movie. You’ll need to modify the DVD video to fit your video. You have two options:
- Add black bars at the bottom and top of the DVD video. The added bars increase the height of the video image so that it’s 4:3. You’ll see the whole content of the original DVD video, but it will look smaller. This method is called “Letterbox”. The above frame should looke like this in letterbox format:

- Crop the DVD videe, removing some content, usually from the sides of the image. You remove just enough content so that the video image is 4:3. You’ll loose some of the content of the original video, but it will occupy the whole screen. This method is called “Pan & Scan”, although we won’t do any panning when we implement this method. The above frame should look like this in cropped format (notice the missing plant on the left hand side):


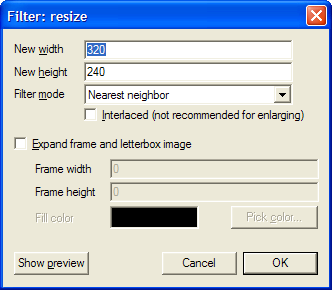
- Choose Video » Filters…. Click the Add… button, choose the resize filter and click the OK button. You’ll see the following dialog:

- Check the Expand frame and letterbox image
- Based on your TV system (Europen PAL or American NTSC), fill the following values in the dialog fields:
Field PAL value NTSC value New width 720 720 New height 432 360 Frame width 720 720 Frame height 576 480 - Click on the OK button. You’ll return to the filter list dialog, which should show the resize filter. Click OK to exit from the filter list. You can now save your letterboxed AVI.
- Add a resize filter as described above. Don’t check the Expand frame and letterbox image, and fill in the following values, based on your TV system (PAL or NTSC):
Field PAL value NTSC value New width 720 720 New height 576 480 - Click on the OK button. You’ll return to the filter list dialog, which should show the resize filter. It should be selected. Now click the “Cropping…” button.
- For fields “X1 offset” and “X2 offset”, fill the value 90. Leave “Y1 offset” and “Y2 offset” as is (zero) and click the OK button. Click OK again to exit the filter list. You can now save your cropped AVI.
There’s a chance the video fragment you’re interested in starts in one VOB and ends in another (probably the next one). You could convert each part separately, but there’s a slight risk of a sound click between segments. To do it the right way, you’ll need to combine the two VOBs into a single file, which you’ll then open in VirtualDub.
If you’re not afraid of using the command line, it’s quite simple to combine two VOBs into once. Just use the COPY command in the following way (assuming the current directory is where you want to store the result VOB):
copy d:VIDEO_TSVTS_01_1.VOB /b + d:VIDEO_TSVTS_01_2.VOB /b COMBINED.VOB
This command says to copy the binary (/b) file VTS_01_1.VOB and the binary file VTS_01_2.VOB into a file called COMBINED.VOB.
3 comments:
Cheap Brand Jeans ShopMen Jeans - True Religion Jeans, burberry polo shirtsGUCCI Jeans, Levi's Jeans, D&G Jeans, RED MONKEY Jeans, Cheap JeansArmani Jeans, Diesel Jeans, Ed hardy Jeans, Evisu Jeans, Women JeansJack&Jones Jeans...Lacoste Polo Shirts, , Burberry Polo Shirts.wholesale Lacoste polo shirts and cheap polo shirtswith great price. clothingol.com offers lot of 10 lacoste polo shirts and lot of 20 cheap polo shirts. clothingol.com offers classic fit polo shirts. polo clothingw
Women are Hermes birkin bag women love fashion Hermes birkin bags Hermes bag women love fashion Hermes bags Hermes replica women love fashion Hermes handbag always the target of the fashion market designer handbags | designer handbag women love fashion | miu miu bag women love fashion | GHD Hair Straightener women love fashion | designer bag women love fashion | designer bags
They would pay considerable amount of money for fashion’s sake. However, women are not simply looking for the fashion items Hermes JPG Birkin | Hermes Birkin | Hermes Birkin Bag | Hermes Bag | Hermes Handbag
with good look.
Post a Comment